Account, Billing, Stock app with GST

Features
- Each And Every Sales, Purchase Entry with View, Update, Delete, credit, debit Options
- Commission Receiver Entry
- All Expense Entry
- Daily Credit and Debit View
- Debit Credit Management System
- Up to date Daybook Entry
- Staff Details Entry
- Daily ledger and daily register view for all entries
- All Entries have update delete view option
- User roles Admin and other users
- Trial Balance
- Year Ending Summary
Note.
Before starting any process you have to first add subcategories, expenses, people entries, customer, vendor, staff, commission receiver. If you don't want to use a commission receiver, leave it blank no problem.
All the input boxes will move to next with the enter key and tab key. In multiline line text boxes you can use Tab Key to move next and Enter Key to the next line .
Add all product entries first, if you don't have purchase bills to enter.That is starting stock entry. If you have to sell the same data in the purchase entry, the products page will be automatically updated with the same data. Or if you have raw materials purchased in the purchase entry and sell a different product you can set it a expense subcategory as raw material and thus simplify the sales bill section.
Sales bill :
You can first enter item code or shelf code and click enter to choose an item details if you remember it. Else click enter key in products text field . You will get a list of items on selected subcategories. If you don't select subcategories all items will be listed. That is too difficult for a big size data. When details get listed you can give qty in qty text field and click enter until the item added..choose continue or stop and after setting discount and cash received you can save. If cash received is less than the bill it will redirect you to the creditor list on left. So remember to add customers in the add people section before setting a new customer.
Credit bill.
Commission receiver message will be shown before saving you can choose it and enter percentage click enter and save .If you want to print click print button. You can print any bill number by giving bill number in the print bill text field.
Purchase bill :
Purchase bill section is the same as the sales bill. The only difference is when you enter a new item press the tab key to move to the description text box from the product text box. Give all the necessary details of the item which is also added to stock data also. If the same item in the stock is purchased the quantity will be added.
Sales due returns and purchase payment returns add page:
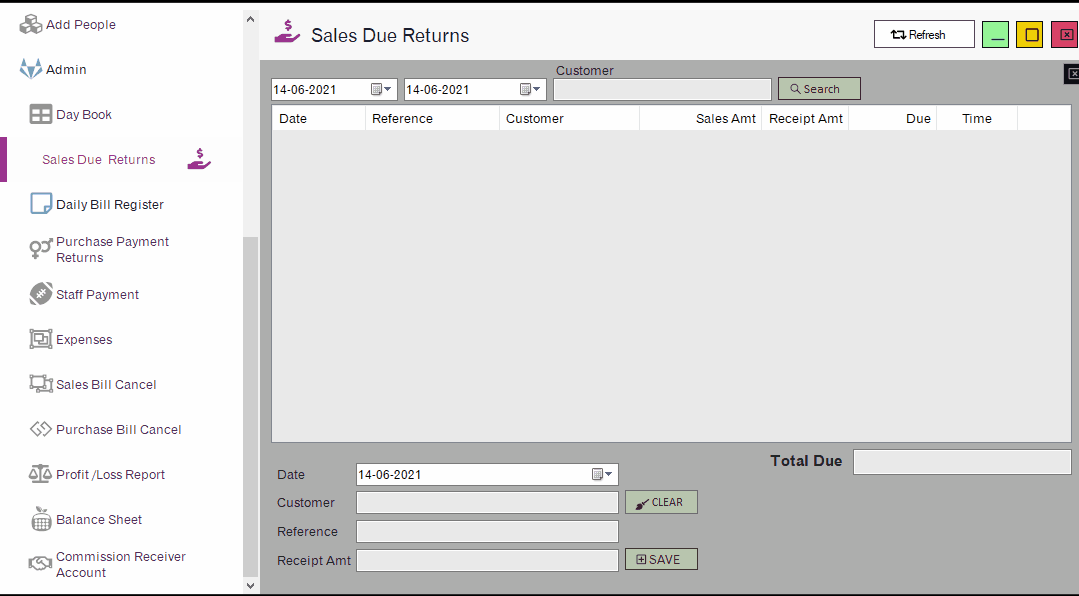 This page can be used to view, add,delete Sales due returns and purchase payment returns . Only the entries added from this page can be deleted from this page. That is, bill related entries can only be deleted with bill cancellation. First select the customer or vendor from the appropriate text box by clicking enter key, you get the name list. Then enter reference, amount etc and save.
Once you select the delete option from this page remember to click the clear button before continuing the save process from this page. For minimizing software size these pages were made multi uses. And thus increased speed.Take care before continuing different operations from the same page. But never a data repetition will happen .That is guaranteed.
This page can be used to view, add,delete Sales due returns and purchase payment returns . Only the entries added from this page can be deleted from this page. That is, bill related entries can only be deleted with bill cancellation. First select the customer or vendor from the appropriate text box by clicking enter key, you get the name list. Then enter reference, amount etc and save.
Once you select the delete option from this page remember to click the clear button before continuing the save process from this page. For minimizing software size these pages were made multi uses. And thus increased speed.Take care before continuing different operations from the same page. But never a data repetition will happen .That is guaranteed.
Daybook Opening cash:

Enter an opening cash calculating the total stock value and cash in hand in the daybook page.Once you enter the opening cash section disappears until a database reset next.Only once you will get a chance to enter opening cash.Take care of it. No update delete option for opening cash. You can delete database if it is starting point.
Note: Opening cash entry date must be before the first daybook entry.
Taxes : automatically set to 0 if you don't give a number.
Only the product section has different update delete view pages. Add people,expense,salary etc pages have update delete view in the same form. Add people: 4 different people: customer ,vendor ,staff, commission receiver .You have to choose the top radio button first and do the action necessary.
Update, Delete for Single form pages
Scroll within the list and select the desired row to update or delete and press Enter key. Update and Delete key will be visible. Do appropriate actions.
Refresh button: Is for solving unexpected database errors .Just close the error box and click the refresh button.